Monday, November 5, 2012

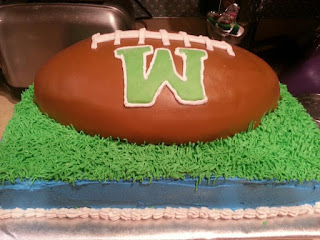
Woodinville Falcons Football Cake


Well, it's that time of year again... time for football season to end.  = (
I volunteered to make the cake for my son's "end of season football party" and ended up with the cake pictured above.  I did a quarter sheet chocolate cake on the bottom with buttercream icing.  Blue on the side, green 'grass' on the top using Wilton tip# 233, and a white shell border (blue, green and white are Woodinville colors). For the football, I used the Wilton football cake pan, did a vanilla cake, and covered it with marshmallow fondant.  White fondant for the laces and a green fondant "W" (for Woodinville) which I outlined with white buttercream icing. 


I was happy with the result, but the best part was watching the team of twenty-one 10-13 year old boys huddle around the cake with their phones taking pictures.  That was a great compliment!  Until next year...
GO FALCONS!!

Saturday, October 13, 2012

Seattle Seahawks inspired birthday cake

My friend Stacy decided to throw her boyfriend a surprise 40th Birthday party! He's very Seattle oriented and very into the Seahawks so we scoured the Internet for ideas and came up with this:


I started out with three 8-inch chocolate cakes for the base and two 6 inch chocolate cakes for the 2nd tier. Next I did a buttercream crumb coat to get it ready to cover with the fondant.


I ran into a small issue with the fondant on the bottom tier that I didn't notice until after the fact.  It seemed you could see the shape of the layers/filling under the fondant.  After some thought I think I rolled the fondant too thin for that layer.  The last cake I made I barely had enough fondant to cover so I think I was overcompensating a little and in an effort to make sure the fondant would cover the cake I think I got it a little thin.  I noticed that I didn't have this issue with the top tier (it was rolled a little thicker) so I'll need to be more careful next time.


We did dark blue & neon green stripes on the bottom tier (Seahawks colors of course).


Then for the top tier I did "Happy Birthday Donti" out of fondant.  I used an exacto knife to cut out the letters.... much harder to do that than I was expecting.


Then on the sides & back of the top tier I did blue & green footballs.


I also did a blue fondant "4" and a green fondant "0" for the top of the cake, but they weren't hardened enough to put in the cake before Stacy picked it up (plus I wouldn't have wanted her to travel with them in the cake anyway... better to stick those in at the last minute).  So at this point the cake is travel ready... hopefully she's able to use the "40" cake topper pieces.  If so (and there's a picture) I will post that later.


So... lessons for this time around:
  • Fondant pieces:  Yes, they can really take a LONG time to harden.  If you want them hardened in time for your event... make them a few days in advance or use an additive like gum paste in your fondant (I've heard it makes the fondant harden much more quickly
  • Covering your cake:  Although it's important to have enough fondant to cover your cake... it's also important to roll it thick enough to be a really nice/smooth surface.. watch your thickness!!
So, hopefully next time the cake will turn out even better!!

And P.S. ..... Happy 40th Birthday Donti !!

Sunday, July 22, 2012

Parisian themed Eiffel Tower cake!

When my good friend asked me to make the cake for her bridal
shower I have to admit that I was a little terrified..... 


A bridal shower is so special and the cake should be extra special too.  I met with her sister to discuss the theme for the shower and see if I could come up with any ideas that would fit the theme (that I would feel comfortable making).  The theme was Paris and the color was "Tiffany Blue"... so I started googling away for ideas. 

The only cake ideas that I found (that I liked) all involved fondant... *sigh* I've never worked with fondant before.  I've had fondant at weddings and always thought it was nasty... so why learn to work with something that tastes so gross??  I've always thought that the main reason for using fondant was to get that perfect looking cake and I've always tried to make sure my cakes tasted good/moist first and looking cute was the secondary priority.  But if I'm going to attempt this cake for my friend then I should do fondant ... which means lots of research (and a couple of trial cakes).

The first trial cake I did was my daughter's birthday cake (the Ariel cake shown in an earlier blog post).  I did two tiers, fondant to cover the layers and used buttercream to pipe the accents.  I learned a lot doing that cake and thought, "I can do this!".  Then a friend of mine suggested that I try marshmallow fondant since I'm not a fan of the taste of fondant.  I found a recipe for marshmallow fondant and it turned out to be really easy and it tastes great.  Super/sickly sweet, but good.... much better than the store bought fondant.  The recipe I used can be found here:  http://candy.about.com/od/fondantcandyrecipes/r/mm_fondant.htm

I found it easy to make and easy to tint... you just add your tint to the melted marshmallow before adding the powdered sugar... then you don't have to worry about it being uneven.  So the next 'trial' cake was a simple two layer chocolate cake covered with marshmallow fondant (just to try out the recipe and try working with it).  It was a hit... the kids (who don't like regular fondant) ate it up!

Next came the research (how to stick fondant accents to the fondant covered cake, etc..) and making the cake topper.  From the ideas I found online for a Parisian themed cake a lot of them had Eiffel tower cake toppers.  Not only did I not want to spend upwards of $30 on a cake topper, but the cutest one I saw was a hand made/craft item.  It seemed easy enough.. so off to the store for supplies.


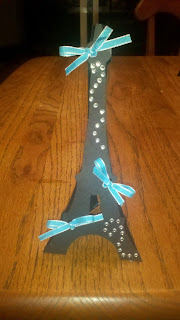
I got black scrapbooking paper, some Tiffany Blue ribbon to make bows and some stick on sparkly beads for 'bling'.  Ben Franklin crafts was nice enough to give me an Eiffel Tower traceable cut-out, but it was smaller than I thought would look good on the cake.  I took that cut-out to Kinko's and just made a couple of larger copies of it for tracing.  After tracing the Eiffel Tower onto the black paper three times & cutting those out I just glued them together to make a stand up Eiffel Tower.  Then I made the bows & added the bows & bling to the tower:


Now time for the cake.  The research I did steered me towards using clear vanilla extract to adhere any fondant accents to the fondant covered cake, so I tried that.  I worked well, the only thing I will do next time is hold the accents onto the side of the cake a little bit longer to make sure they don't slide.

Here are some of the things I learned while doing this cake:

  • It's always better to make extra fondant.  I was trying to be conservative and barely had enough Tiffany Blue to cover the cakes.  It would have been better to have made more so covering was easier.
  • Accents that you would like hardened (to hold their shape... like bows) are best if made as early as possible (even the night before).
  • Buttercream works well to adhere things in tough areas (like the fondant balls around the base of the cake)
  • Measure, measure, measure... when the cake is 4 inches on the side and 10 inches across... you really do need your fondant circle at least 18 inches wide if you want it to reach the bottom of your cake! LOL


I feel more comfortable/confident working with fondant now... I will not be making this my new specialty by any means .. it's super time consuming (at least for this beginner)... but I will not be scared to try it again if the cake design calls for it!
Saturday, July 7, 2012

The Little Mermaid!


I found some very cool cake ideas online (thanks to Google) and picked out an 'Ariel underseas' type of design for my daughter's 5th Birthday party.  From the images I saw it looked like the cake was iced in a light blue tinted buttercream, but having never worked with fondant I thought I would give it a shot.

I started with my cakes... two 8 inch round chocolate cakes and two 6 inch round vanilla cakes.  I put a vanilla custard filling in between the layers of the chocolate cakes, frosted them with buttercream and covered them with the light blue fondant.  Then I repeated these steps with the vanilla cakes.  I didn't dowel the cakes at all because I'm not transporting this cake, but if you plan to transport yours I would highly recommend putting some wooden or plastic dowels in.


I learned some lessons on this cake:
  • Watch your cake trimming... LOL.  When you're hoping to have the bottom cakes a little bit larger than the top layers don't trim the heck out of them!
  • When working the fondant before rolling it out... keep kneading it...  I tend to get impatient, but mine could have been worked a little bit longer.  It probably would have rolled a tiny bit easier.
  • When trimming the fondant... go easy.  You can always take more off the bottom, but you can't add it back on.
  • Shorter nails make working with the fondant easier.  Mine are getting a little long right now and I was constantly worried that I would leave little half moon indents into the fondant.


The next steps were adding the ocean accents using tinted buttercream.  I used Wilton tip 352 to make the seaweed and the awesome part of using buttercream accents.... it allowed me to cover up any imperfections in the fondant.  I had to small tears in the fondant that I didn't have any luck trying to fix so I covered them up with the seaweed! Woot woot!

And the finished product:

I hope my daughter enjoys her Ariel undersea adventure cake as much as I enjoyed making it for her!!


Tuesday, April 10, 2012

Easter Basket Cupcakes

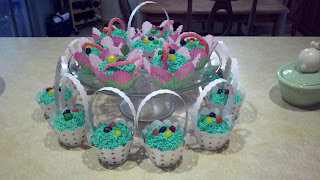
My latest project.... Easter basket cupcakes.  I scoured the Internet for ideas and decided on two different cupcakes... a rustic, fun basket with a candy handle ....


and a quicker, easier, pre-made basket cupcake wrapper.....


Although I do like how each style of cupcake turned out, I have to say that I'm a big fan of the pre-made cupcake wrappers! They're fun, fairly inexpensive and could easily be re-used.  I got these ones at Michael's craft store and they were very easy to put together and made my cupcake look cute!

To make these I cheated a bit.... Betty Crocker French Vanilla cake mix... followed all the instructions and baked about 18 cupcakes (I like bigger cupcakes).  Then I used Wilton's boxed buttercream frosting.  I do make my own buttercream most of the time, but sometimes find the Wilton boxed buttercream to be a little firmer/easier to work with.  I added green tint to the frosting and used tip # 233 to make the grass. 


Then it's as easy as adding some jelly bean eggs and dropping the cupcake gently into the basket wrapper!

Monday, April 9, 2012

My Mom's Jell-O Eggs

I just wanted to share my Mom's Jell-O Eggs with you. 


This is a long standing tradition in my family.  My Mom made Jell-O Eggs for as long as I can remember... definitely before they had fancy Jell-O egg molds! It takes planning to do it this way... it means scrambled eggs for a week or two before Easter, but the end result is well worth it! 

Ingredients:
8-12 emptied egg shells
1 large box green Jell-O
1 small box of each other colors of Jell-O that you'd like for your 'eggs' (I use raspberry for the red, grape, 'berry blue', lemon & orange)
1 tub Cool Whip
1 Basket to display your Jell-O Eggs
Saran/plastic wrap

You start by taking your egg(s) and tapping the top with a sharp knife until you have tiny hole.  Once I have a tiny hole I stick the tip of my knife in the hole and 'pop out' a small piece of egg shell.  From there it becomes easier to pick little bits of shell away (either with your knife tip or finger nail) until you have a small hole about the size of a dime (maybe just a tad smaller).  Then you shake your egg until it all shakes out of the shell (I usually do this into a little bowl so I can make sure there are no bits of eggshell in there) and you have eggs to scramble or add to pancake or cake batter.  I do this for a good week/week & a half before Easter until I have 8-12 empty eggshells (be sure to rinse them very well and let them dry prior to Jell-O time). 

You should plan to do most of the Jell-O prep the night before and the first thing I do is prep my basket.  This means taking two sheets of plastic wrap, placing them in the basket, pushing down to form it into the basket, and then using a knife tip (or toothpick) to push the saran wrap into the little holes/cracks in the wicker of the basket (just to make it less obvious). Next comes the Jell-O.  I get a big pot of water boiling and just keep it going while I do the Jell-O, makes it easier to just dip the measuring cup in & get water each time.  For the green Jell-O, I make it in one big bowl and set it aside to refrigerate later.  For all the other colors I have my emptied egg shells lined up in the egg carton (hole-side up), I make the Jell-O, and the using a funnel I slowly pour the Jell-O into approximately 2-3 eggs per color.  The rest of the unused Jell-O can be put into little tupperwares for individual desserts.  Once you have the egg shells filled with the various colors of Jell-O you refrigerate overnight.

Once you're ready to serve your Jell-O Egg dessert you'll need to assemble it.  This can take up to 15-20 minutes depending on how quickly the egg peeling goes, so sometimes I peel the eggs the morning I plan to serve the dessert (they can be gently placed in a tupperware and stored in the fridge until you're ready to assemble).  For assembly:  You mix a half cup to a cup of Cool Whip (I just eyeball it) into your green Jell-O (mix this well so you have little chunks of green).  Pour this mixture into your basket and you have the 'grass'.  Next you peel each egg (this must be done fairly carefully so you get as much of the 'egg' intact as possible). Gently place each Jell-O egg in the grass and you have a beautiful (and yummy) finished product that everyone will love.

Side note:  I have tried the plastic Jell-O egg molds and find that they often don't work well.  Most of the time my eggs split in half when I attempt to open the container.  I've tried several tricks including running the mold under warm water prior to opening it and I always get the same result.  Plus, for me.... using real egg shells brings back fond memories of holidays with my Mom.  I always had to eat scrambled eggs for weeks before Easter and always 'oohed & ahhed' when she finished with the Jell-O eggs.  Now, to keep that tradition going with my children is priceless.  Enjoy.

Friday, February 24, 2012

Coffee Cup Cake Bites

My Father-in-Law is celebrating his 80th birthday and since he's such a coffee fiend, my Mother-in-Law is throwing him a coffee themed open house style party so all his friends can stop by & help him celebrate. She's planning on having finger foods and lots of cookies/desserts ... the coffee theme idea really had me intrigued... what can I make to go with the coffee theme?!? I'm so into cake pops & bites right now that I decided to see if I could do something along those lines and came up with this:


I made cake balls just like you would make for any regular cake pop, but I put them in the freezer for about 10-15 minutes (this makes them easier to shape into other shapes besides round balls).  Once the cake balls had firmed up I took them out and began shaping them into cylinder shapes (they looked kind of like beige marshmallows). 


I took pretzels (tiny twists) and cut them so I could use only the rounded sections.  I placed one rounded pretzel piece into each cake cylinder to create the handle of the coffee mug:


I used a popsicle stick to dip the coffee mugs into melted white candy chips, used a toothpick to help get the excess candy coating off of the mugs, and then using the toothpick (pushing down on the top of the coffee mug) I gently pushed it off the popsicle stick onto wax paper to finish setting up.

I attempted to use special cookie/candy gel (black) to make the coffee in the top of the mug but the color didn't turn out right so I ended up using melted chocolate.


I had previously purchased a cheap candy writer at Michael's for writing on cake pops and found when trying to do the baby shower cake pops that it didn't work very well.  I did some research online and discovered that 'Gourmet Writers' was one of the most highly rated edible writing products so I found some on Amazon and after this project I HIGHLY recommend them:


What a fun project this has been! I hope that all of my Father-in-law's friends enjoy the coffee cup cake bites! I can't wait for the next opportunity to make cake bites!!

Saturday, February 18, 2012

Cupcake Bites!


I tried making Cupcake Bites for the first time tonight... very fun! I think I either need a larger candy mold or I need to make smaller cake balls though. Here are some pics from tonight:


Saturday, February 11, 2012

Previous cakes & cupcakes

Here are some of my previous cakes & cupcakes:

This was a Tinkerbell cake I made for my daughter's 3rd birthday


This is the start of a bridal shower cake I did for my friend who got married in Vegas...


This was the final product of the Vegas bridal shower cake:


The next three pictures are a cake I made for my son's 'end of season' baseball party:


This cupcake was also part of an 'end of season' baseball party. I incorporated little chocolate baseballs and did green grass frosting... I thought they turned out pretty well.


This was a GI Joe birthday cake for my son's 8th birthday:


This was for my daughter's first birthday: