Tuesday, April 10, 2012

Easter Basket Cupcakes

My latest project.... Easter basket cupcakes.  I scoured the Internet for ideas and decided on two different cupcakes... a rustic, fun basket with a candy handle ....


and a quicker, easier, pre-made basket cupcake wrapper.....


Although I do like how each style of cupcake turned out, I have to say that I'm a big fan of the pre-made cupcake wrappers! They're fun, fairly inexpensive and could easily be re-used.  I got these ones at Michael's craft store and they were very easy to put together and made my cupcake look cute!

To make these I cheated a bit.... Betty Crocker French Vanilla cake mix... followed all the instructions and baked about 18 cupcakes (I like bigger cupcakes).  Then I used Wilton's boxed buttercream frosting.  I do make my own buttercream most of the time, but sometimes find the Wilton boxed buttercream to be a little firmer/easier to work with.  I added green tint to the frosting and used tip # 233 to make the grass. 


Then it's as easy as adding some jelly bean eggs and dropping the cupcake gently into the basket wrapper!

Monday, April 9, 2012

My Mom's Jell-O Eggs

I just wanted to share my Mom's Jell-O Eggs with you. 


This is a long standing tradition in my family.  My Mom made Jell-O Eggs for as long as I can remember... definitely before they had fancy Jell-O egg molds! It takes planning to do it this way... it means scrambled eggs for a week or two before Easter, but the end result is well worth it! 

Ingredients:
8-12 emptied egg shells
1 large box green Jell-O
1 small box of each other colors of Jell-O that you'd like for your 'eggs' (I use raspberry for the red, grape, 'berry blue', lemon & orange)
1 tub Cool Whip
1 Basket to display your Jell-O Eggs
Saran/plastic wrap

You start by taking your egg(s) and tapping the top with a sharp knife until you have tiny hole.  Once I have a tiny hole I stick the tip of my knife in the hole and 'pop out' a small piece of egg shell.  From there it becomes easier to pick little bits of shell away (either with your knife tip or finger nail) until you have a small hole about the size of a dime (maybe just a tad smaller).  Then you shake your egg until it all shakes out of the shell (I usually do this into a little bowl so I can make sure there are no bits of eggshell in there) and you have eggs to scramble or add to pancake or cake batter.  I do this for a good week/week & a half before Easter until I have 8-12 empty eggshells (be sure to rinse them very well and let them dry prior to Jell-O time). 

You should plan to do most of the Jell-O prep the night before and the first thing I do is prep my basket.  This means taking two sheets of plastic wrap, placing them in the basket, pushing down to form it into the basket, and then using a knife tip (or toothpick) to push the saran wrap into the little holes/cracks in the wicker of the basket (just to make it less obvious). Next comes the Jell-O.  I get a big pot of water boiling and just keep it going while I do the Jell-O, makes it easier to just dip the measuring cup in & get water each time.  For the green Jell-O, I make it in one big bowl and set it aside to refrigerate later.  For all the other colors I have my emptied egg shells lined up in the egg carton (hole-side up), I make the Jell-O, and the using a funnel I slowly pour the Jell-O into approximately 2-3 eggs per color.  The rest of the unused Jell-O can be put into little tupperwares for individual desserts.  Once you have the egg shells filled with the various colors of Jell-O you refrigerate overnight.

Once you're ready to serve your Jell-O Egg dessert you'll need to assemble it.  This can take up to 15-20 minutes depending on how quickly the egg peeling goes, so sometimes I peel the eggs the morning I plan to serve the dessert (they can be gently placed in a tupperware and stored in the fridge until you're ready to assemble).  For assembly:  You mix a half cup to a cup of Cool Whip (I just eyeball it) into your green Jell-O (mix this well so you have little chunks of green).  Pour this mixture into your basket and you have the 'grass'.  Next you peel each egg (this must be done fairly carefully so you get as much of the 'egg' intact as possible). Gently place each Jell-O egg in the grass and you have a beautiful (and yummy) finished product that everyone will love.

Side note:  I have tried the plastic Jell-O egg molds and find that they often don't work well.  Most of the time my eggs split in half when I attempt to open the container.  I've tried several tricks including running the mold under warm water prior to opening it and I always get the same result.  Plus, for me.... using real egg shells brings back fond memories of holidays with my Mom.  I always had to eat scrambled eggs for weeks before Easter and always 'oohed & ahhed' when she finished with the Jell-O eggs.  Now, to keep that tradition going with my children is priceless.  Enjoy.

Friday, February 24, 2012

Coffee Cup Cake Bites

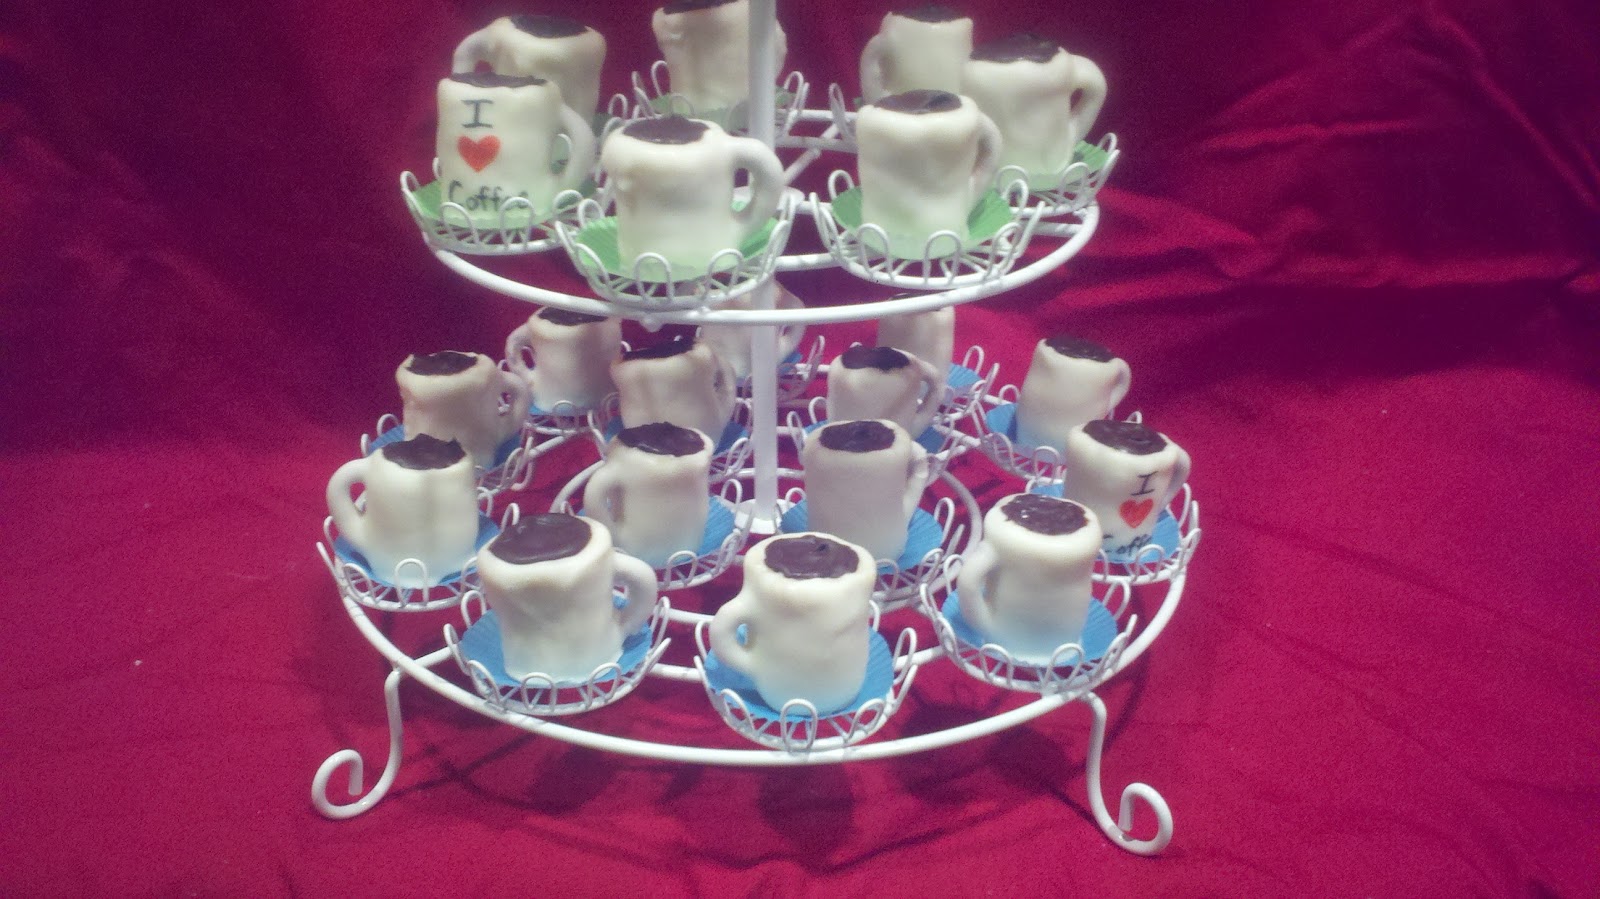
My Father-in-Law is celebrating his 80th birthday and since he's such a coffee fiend, my Mother-in-Law is throwing him a coffee themed open house style party so all his friends can stop by & help him celebrate. She's planning on having finger foods and lots of cookies/desserts ... the coffee theme idea really had me intrigued... what can I make to go with the coffee theme?!? I'm so into cake pops & bites right now that I decided to see if I could do something along those lines and came up with this:


I made cake balls just like you would make for any regular cake pop, but I put them in the freezer for about 10-15 minutes (this makes them easier to shape into other shapes besides round balls).  Once the cake balls had firmed up I took them out and began shaping them into cylinder shapes (they looked kind of like beige marshmallows). 


I took pretzels (tiny twists) and cut them so I could use only the rounded sections.  I placed one rounded pretzel piece into each cake cylinder to create the handle of the coffee mug:


I used a popsicle stick to dip the coffee mugs into melted white candy chips, used a toothpick to help get the excess candy coating off of the mugs, and then using the toothpick (pushing down on the top of the coffee mug) I gently pushed it off the popsicle stick onto wax paper to finish setting up.

I attempted to use special cookie/candy gel (black) to make the coffee in the top of the mug but the color didn't turn out right so I ended up using melted chocolate.


I had previously purchased a cheap candy writer at Michael's for writing on cake pops and found when trying to do the baby shower cake pops that it didn't work very well.  I did some research online and discovered that 'Gourmet Writers' was one of the most highly rated edible writing products so I found some on Amazon and after this project I HIGHLY recommend them:


What a fun project this has been! I hope that all of my Father-in-law's friends enjoy the coffee cup cake bites! I can't wait for the next opportunity to make cake bites!!

Saturday, February 18, 2012

Cupcake Bites!


I tried making Cupcake Bites for the first time tonight... very fun! I think I either need a larger candy mold or I need to make smaller cake balls though. Here are some pics from tonight:


Saturday, February 11, 2012

Previous cakes & cupcakes

Here are some of my previous cakes & cupcakes:

This was a Tinkerbell cake I made for my daughter's 3rd birthday


This is the start of a bridal shower cake I did for my friend who got married in Vegas...


This was the final product of the Vegas bridal shower cake:


The next three pictures are a cake I made for my son's 'end of season' baseball party:


This cupcake was also part of an 'end of season' baseball party. I incorporated little chocolate baseballs and did green grass frosting... I thought they turned out pretty well.

This was a GI Joe birthday cake for my son's 8th birthday:


This was for my daughter's first birthday:

Christmas Cake Pops


I am so grateful to Bakerella for creating cake pops! If you don't own her book ("Cake Pops"), you should get it.  She also has a website: http://www.bakerella.com/ and in my opinion is a creative genius!

Since receiving her book as a Christmas gift (thank you Honey!!) I've had so much fun trying to recreate some of her wonderful treats!

These are the Snowman cake pops I made at Christmas time.  My mother-in-law loves snowmen, so I thought this would be a fun treat to share with her.


I found this cute little basket that looks like a top hat at Michael's craft store and thought it would make a perfect way to display the cake pops.  I placed a piece of styrofoam in the bottom of the basket, added some green gift bag grass and stuck the cake pops in!


This was my first attempt at making a cake pop.  I wanted something super cute for our Christmas cookie/treat exchange and decided on Christmas tree cake pops.  The candy coating ended up being a little thick for my taste, but not too bad for a first try!


Baby Shower Cake Pops

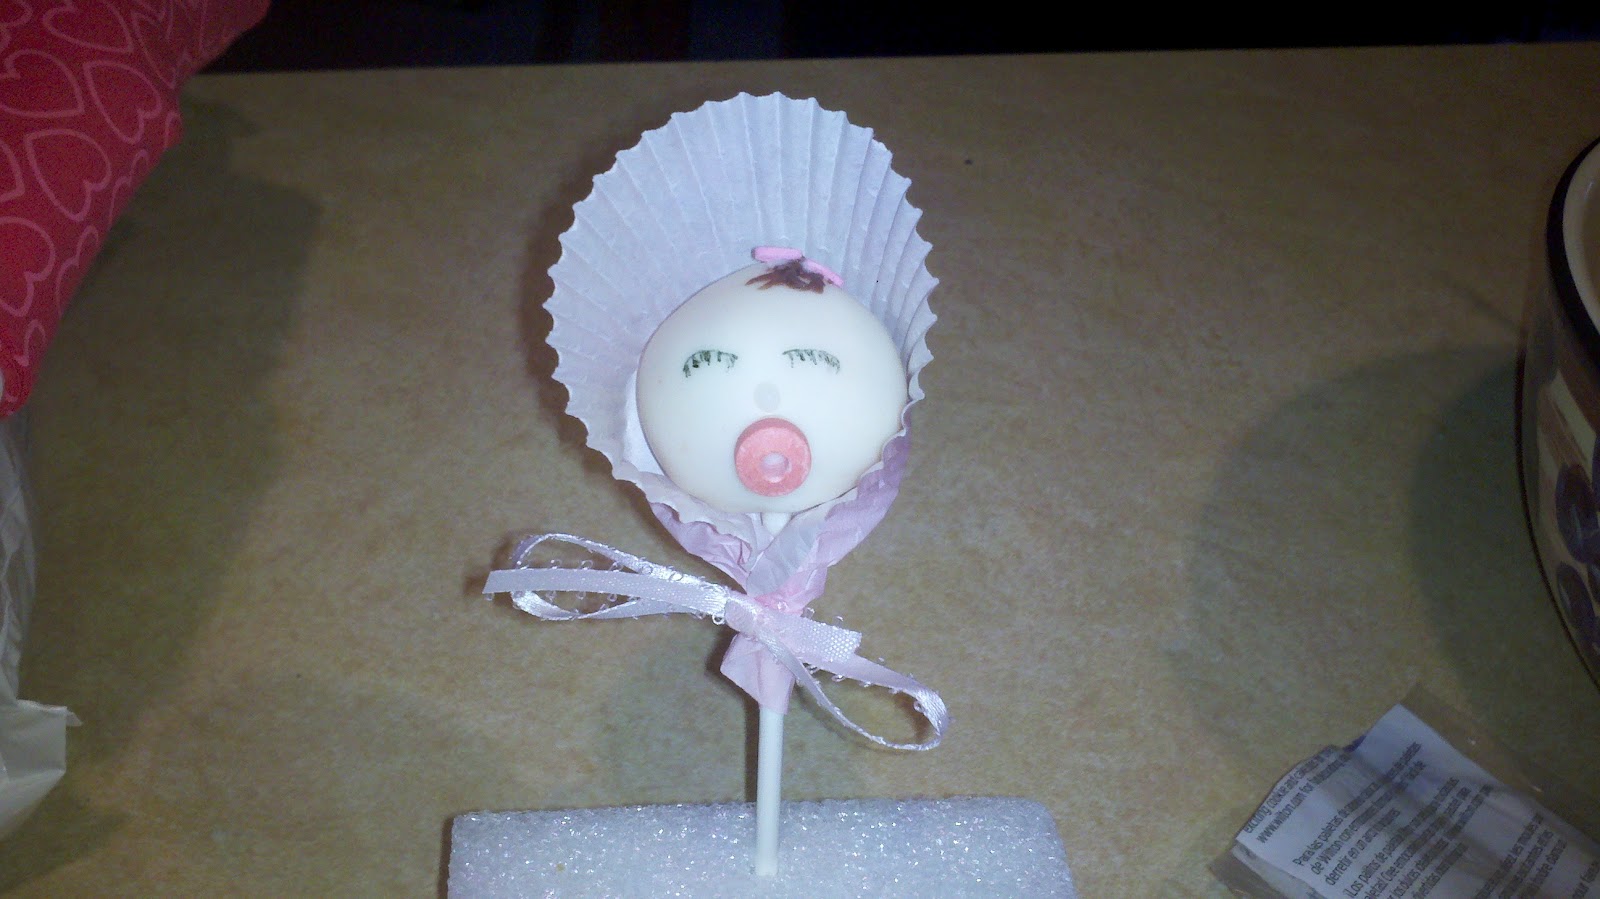
I made these cake pops for a friend's baby shower and they were a hit! I used vanilla cake and cream cheese frosting for the cake pop (my current favorite combo), dipped them in white candy melts, used edible black marker (for cookies & such) to draw on the eyes/eyelashes, melted chocolate for the hair, pink candy sprinkle hearts for the hair bow, a pink candy from those candy necklaces for the pacifier and a pink cupcake paper for the bonnet.

You could do the same with blue items for a baby boy shower and the display options are wide open too.  I place some crinkled up tissue paper in a cute lavendar basket I had lying around the house and gently laid the cake pops in the basket.  It looked like a bunch of sleeping babies... super cute.